
Ingredients
Main Ingredients (1 x 17cm Chiffon Cake Mold (8 servings))
Seasonings
Steps
- Separate 4 eggs into egg whites and yolks. Place the egg whites in a large bowl and chill in the refrigerator until ready to use. (This is key!) Chilling the egg whites helps them whip up better.
- Preheat your oven to 170℃ (340℉).
- Lightly whisk the egg yolks. Add 1/3 of the 70g granulated sugar and mix until pale and creamy. (This is key!) Mix quickly after adding the sugar and ensure there are no gritty grains left.
- Add 50ml vegetable oil to the egg yolk bowl and mix well for about 30 seconds.
- Next, add 65ml milk and mix until the grittiness from the sugar disappears.
- Sift in 80g cake flour and gently mix until just combined, being careful not to let the flour fly everywhere. The egg yolk batter is now ready.
- Whip the chilled egg whites with a hand mixer on high speed for 30 seconds. Once coarse foam forms, add half of the 70g granulated sugar and continue whipping on high speed for another 30 seconds.
- Add the remaining 70g granulated sugar and whip on high speed for 30 seconds. Switch to low speed and whip for 1 minute until stiff peaks form and the meringue is smooth and glossy. (This is key!) Finishing on low speed creates a fine-textured and stable meringue.
- Add 1/3 of the whipped meringue to the egg yolk batter and mix thoroughly to even out the batter's consistency.
- Add another 1/3 of the meringue and gently fold it into the batter using a whisk, lifting from the bottom. Be careful to avoid large lumps of meringue.
- Pour the remaining egg yolk batter back into the bowl with the meringue and fold gently from the bottom using a whisk.
- Once there are no visible lumps of meringue, switch to a rubber spatula and gently fold the batter from the bottom, ensuring no unevenness. (This is key!) Mix carefully, checking for any unmixed areas or settled meringue.
- Pour the batter evenly into the 17cm chiffon cake mold, dividing it between both sides.
- Gently swirl a bamboo skewer about 10 times through the batter to remove large air bubbles and flatten the surface.
- Bake in the preheated 170℃ (340℉) oven for 7 to 10 minutes until the surface is lightly baked.
- Remove from the oven and quickly make 4 slits on the surface of the batter.
- Return to the 170℃ (340℉) oven and bake for an additional 25 minutes. Total baking time is 35 minutes. (This is key!) Making slits halfway through the baking process helps the cake rise evenly and fluffily.
- In a bowl, add 150ml heavy cream and 1 tbsp granulated sugar. Whip while chilling in an ice bath until stiff peaks form (80% whipped).
- Transfer the whipped cream to a piping bag. Keep chilled in the refrigerator until ready to use.
- Immediately after baking, invert the chiffon cake mold and let it cool completely. (This is key!) Inverting the mold prevents the cake from shrinking and ensures a fluffy texture.
- Once completely cool, remove the cake from the mold. For the sides, firmly press with your hands or run a thin knife around the edge. For the bottom, invert the mold and push the center part upwards.
- Slice the demolded chiffon cake into 8 equal pieces.
- Make a cut in the center of each sliced piece, without cutting all the way through.
- (Optional) Trim the edges of the chiffon cake pieces for a neater shape.
- Gently open the cut in each chiffon cake slice and generously pipe in the whipped cream from the piping bag.
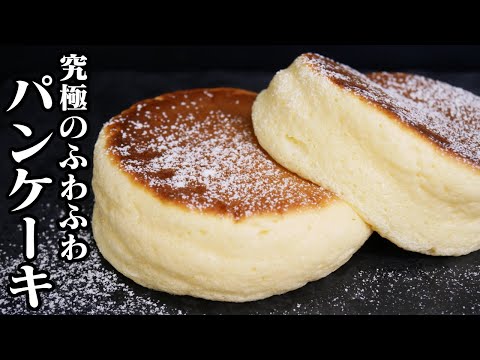
- (Optional) Garnish with fruits or other toppings before serving. Enjoy!
料理研究家ゆかりのおうちで簡単レシピ / Yukari's Kitchenさんの他のレシピ


🍷 編集部おすすめペアリング
※HowToCook.JP編集部による提案です。動画内でシェフが推薦したものではありません。
ボルドー ソーテルヌの1級シャトー スデュイロー。貴腐ブドウ由来の濃厚な甘みとハチミツ香。フォアグラ・ブルーチーズに
6–10℃ Amazonで探す →カナダ産ノーザン・アイス ヴィダル アイスワイン。凍らせたブドウ由来の超濃縮の甘みと高酸味。アイスクリーム・フルーツタルトに
4–8℃ Amazonで探す →ポルトガルの老舗グラハムのルビー ポート。ブランデー添加の酒精強化ワインで濃厚な甘み。チョコレート・ナッツ・熟成チーズに
14–18℃(ルビー)/ 冷やして(タウニー) Amazonで探す →仕込み水の一部を完成した日本酒に替えて醸した濃厚甘口の特別酒。蜂蜜・カラメルのような豊かな甘みがあり、チーズケーキ・和菓子・フォアグラ料理と驚くべき相性
5–15℃(冷酒) Amazonで探す →米麹を粗く漉した乳白色のクリーミーな酒。自然な甘みと米の旨みが強く、辛い料理との対比・デザート感覚でも楽しめる。キムチ鍋・スパイスカレー・甘辛ダレ焼き鳥に
5–12℃(雪冷え〜花冷え) Amazonで探す →3年以上の熟成でアミノ酸が増加し旨みとまろやかさが深化。ナッツ・バター・カラメルのような香りが加わり、ウォッシュチーズ・燻製料理・うなぎの蒲焼きと好相性
10–45℃(冷〜上燗) Amazonで探す →焙煎麦芽のロースト香と深いコク。チョコレート・コーヒーのニュアンス。牛肉の煮込み・牡蠣・チョコレートデザートに
8–13℃ Amazonで探す →アルコール8〜12%の極めて濃厚な黒ビール。ダークチョコ・エスプレッソ・バニラのような深み。チョコレートケーキ・スモーク料理・熟成チーズに
10–16℃ Amazonで探す →日本のクラフトビール先駆け的ブルワリー。チョコレートスタウト・スイートバニラスタウトなど個性的なフレーバービールで有名。チョコレートデザート・アイスクリームに
8–13℃ Amazonで探す →スパークリングワインの華やかさを再現。誕生日・クリスマスなど特別なシーンで本格的な食事体験を提供
6–10℃ Amazonで探す →⚠️ お酒に関する注意事項
20歳未満の飲酒は法律で禁止されています。飲酒運転は法律で禁止されています。
妊娠中や授乳期の飲酒は、胎児・乳児の発育に影響するおそれがあります。お酒は適量を。
🔍 関連する検索